How To Build an Index-Time Search-As-You-Type Feature with Elasticsearch

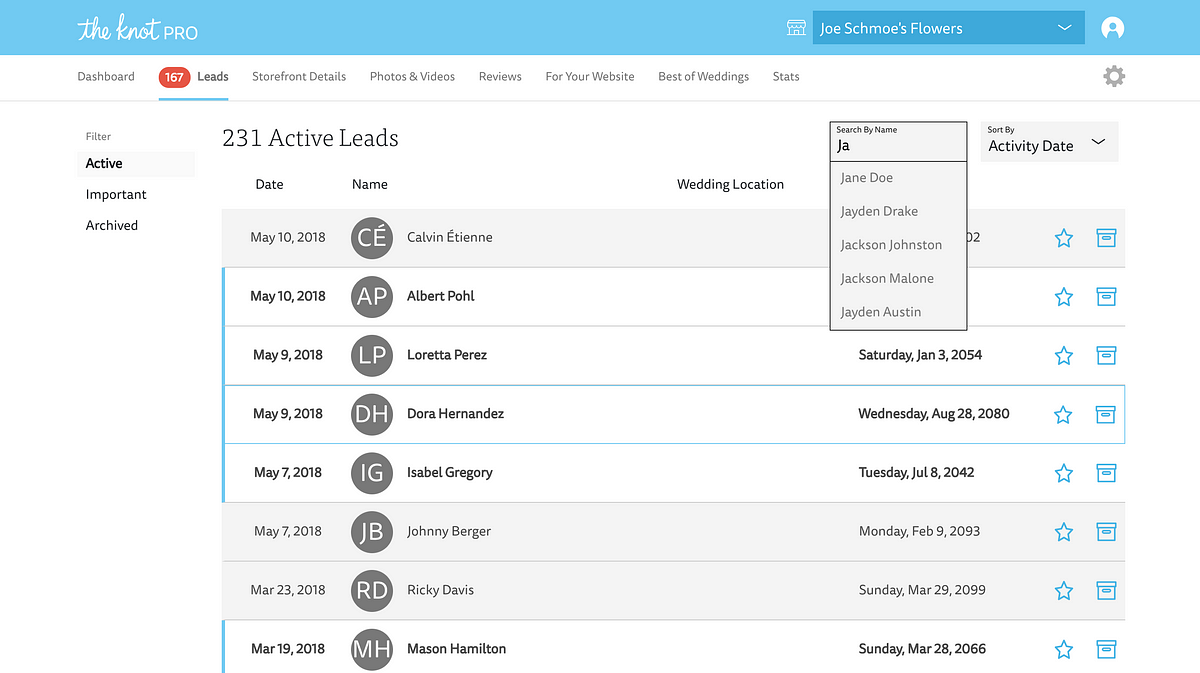
The “Search By Name” feature on this page hits an API endpoint that queries Elasticsearch with a partial name and responds with the names of the matching customers. If the user clicks on a name then they’ll follow a link to see more about that customer.
A useful feature that can be built with Elasticsearch is a search-as-you-type tool that will match on partial strings. As part of my job, I work on a web application that allows vendors to view leads for potential customers. Let’s say one of our vendors is a popular florist named “Joe Schmoe’s Flowers.” Joe Schmoe’s Flowers has thousands of these business leads, but oftentimes Mr. Schmoe just wants to find a particular lead or set of leads by the customer’s name. For performance reasons, we obviously don’t want the front-end to be fetching all the leads at once. However, this also precludes us from doing front-end filtering of all the leads by name. In order to build this feature, we have to take a deeper dive into Elasticsearch.
Let me give some background before we jump into the action. We have a pre-existing Elasticsearch cluster as the read-store for our app. We’re using Elasticsearch version 5.1, but the syntax that I’ll walk you through should be similar in other versions. When I was working on this feature, our Elasticsearch cluster was hosted in AWS. Currently, AWS restricts some of the actions you can typically perform against an Elasticsearch cluster, but everything I’m doing in this guide should be kosher with AWS. If you’re not using AWS then there may be some shortcuts you can take, but this guide should still work for you.
Our customer leads data is stored in an index called example-v1. In our hypothetical back-end code, we’re using an index alias that we’ve named example which, for the time being, points to the example-v1 index. Aliases are great because you can easily change an alias in Elasticsearch to point to a new index (e.g. example-v2) without having to make changes in your code. We’ll be doing that a bit later.
Now let’s look at the kind of data we’re storing:
Filtering on First Name Edge n-Grams:
Our goal is to filter the vendor’s leads by the customer’s first name (customerInfo.name.first).
This is the behavior we expect if we are querying our sample data above:
- If we pass “J” or “Ja” to our query then it should return all three of the documents (Jane, Janet and Jake).
- If we type “Jan” or “Jane” then we should only get the documents for Jane and Janet.
- If we put in a query that started with any letter other than “J” then we should get no results because all of our customers have first names starting with “J”.
- The casing of our query value should be ignored.
There is more than one way to achieve this behavior. For instance, you could perform a query that analyzes your text at query-time. This approach requires less upfront legwork but also suffers from some performance overhead.
Instead, we’re going to implement an index-time search-as-you-type. This means that all the analysis to break up the text into its substrings (i.e. edge n-grams) is done at the time of indexing instead of at query time.
Defining a Custom Filter and Analyzer for your Index Settings:
An n-gram is just a contiguous sequence of “n” number of characters. An edge n-gram is one that always starts with the first character of a word. It’s easier to understand with an example. For instance, all the edge n-grams for “Joe” are “J”, “Jo”, and “Joe”. Elasticsearch allows us to analyze fields in this way at index time, but it requires some configuration in our index settings.
First, we’re going to need a token filter. We’ll call it autocomplete_filter.
We’re also going to need an analyzer that makes use of the autocomplete_filter we just defined. We’ll call it autocomplete.
And that’s a custom analyzer in Elasticsearch! For querying purposes, a value indexed into any field with this analyzer will be normalized to lowercase and be broken up into edge n-grams with a minimum length of 1 and maximum length of 20. You can tune this for your particular feature. If you know that you won’t be supporting searches with fewer than 3 characters, then you can safely set the minimum n-grams length to 3. This will save you some storage and prevent Elasticsearch from doing unnecessary work to generate the n-grams of length 1 or 2 at index time.
Update Mappings and Settings to Include New Analyzer:
Now that we’ve talked about the token filter and analyzer, let’s actually add them to our index settings and update our mapping to take advantage of the new autocomplete analyzer.
(NOTE: When you change your settings and mappings like this, you are probably signing yourself up for a re-index. It’s a good idea to create a brand new index with the new settings/mapping rather than messing with your existing index.)
Our existing index is called example-v1 so let’s create a new example-v2 index and add our settings and mapping to it. I’m using Kibana’s interface to create it, but you could also use cURL.
Re-indexing:
In order populate your new index with data from the old index, you can use the incredibly handy Elasticsearch re-index API. Before we do that though, let’s temporarily optimize our example-v2 index for re-indexing.
Now we should be ready to kick off the re-index. If you have a lot of documents, this will be a long-running process. Passing the wait_for_completion=false flag will make it so that you get back a task ID that you can use to track the progress of the re-index.
The task ID should look something like aUnby_t4De2z2Ob6JaG7mA:16998784. With this task ID you can look at the progress of the re-index and see if it encountered any hiccups.
GET _tasks/aUnby_t4De2z2Ob6JaG7mA:16998784
Or you can cancel the re-index:
POST _tasks/aUnby_t4De2z2Ob6JaG7mA:16998784/_cancel
When your re-index is done, make sure to change your index settings back so that the index is actually useable. Something like this will work for now:
Querying:
Okay, we had to lay a lot of groundwork, but now we can get to the good part. Let’s query some stuff. (Note that we’ll want to explicitly set the search analyzer to standard)
Hooray! We only get back the documents for Jane and Janet, but maybe we want to make sure that we’re confining our search to the leads that belong to Joe Schmoe’s Flowers so let’s filter our query by his vendorId.
That’s better! But wouldn’t it be nice if Jane’s document were the first match? After all, our query exactly matched her entire first name. Let’s have Elasticsearch look at more than one field and boost the score of results that match the entire first name. Since our query is getting a little more complex, let’s also add a size parameter so that we don’t get back more results than we need.
Perfect! Now we are getting a maximum of five results, filtering to Joe Schmoe’s leads, matching on edge n-grams and boosting complete first name matches to the top of the results.
Swap the Aliases:
If you’ve been using an alias like example in your code to point to the example-v1 index and you’re ready to switch over to using example-v2 then you can swap out the aliases with a single command and your code will start working off your new example-v2 index. It’s as easy as:
Conclusion:
This is just a quick introduction to what you can do with custom analyzers, multi-match queries and the reindex API. You could easily apply the same logic we did on first name to last name, or you could come up with more complex rules to sort your results (e.g. by the date that the lead was created). Hopefully, this gave you enough information to start experimenting for yourself!
Bonus Re-indexing Tip:
It’s not necessary for the search-as-you-type feature, but since we discussed re-indexing, I wanted to mention using scripts with re-indexing. These can be used to manipulate your data during the re-index and provide you with a relatively easy way to clean up unneeded fields from your document. If, for example, you were no longer going to be using the last name in the future, then you can add an inline script to your reindex request to remove the old, legacy field. That would look like this: